|
|
Application module:
Dimension tolerance |
ISO/TS 10303-1050:2019(E)
© ISO
|
This clause specifies the information requirements for the
Dimension tolerance
application module. The information requirements are specified as the
Application Reference Model (ARM) of this application module.
NOTE 1 A graphical representation of the information
requirements is given in
Annex C.
NOTE 2 The mapping specification is specified in
5.1. It shows how
the information requirements are met by using common resources and
constructs defined or imported in the MIM schema of this application
module.
This clause defines the information requirements to which implementations shall
conform using the EXPRESS language as defined in ISO 10303-11.
The following begins the
Dimension_tolerance_arm
schema and identifies the necessary external references.
EXPRESS specification:
         *)

            SCHEMA Dimension_tolerance_arm;
(*
The following EXPRESS interface statements specify the elements
imported from the ARMs of other application modules.
EXPRESS specification:
*)

            USE FROM
            Activity_arm;
               --
            ISO/TS 10303-1047
            USE FROM
            Derived_shape_element_arm;
               --
            ISO/TS 10303-1130
            USE FROM
            Document_assignment_arm;
               --
            ISO/TS 10303-1122
            USE FROM
            Extended_measure_representation_arm;
               --
            ISO/TS 10303-1106
            USE FROM
            Value_with_unit_extension_arm;
               --
            ISO/TS 10303-1753
(*
NOTE 1
The schemas referenced above are specified in the following
part of ISO 10303:
| Activity_arm |
ISO/TS 10303-1047 |
| Derived_shape_element_arm |
ISO/TS 10303-1130 |
| Document_assignment_arm |
ISO/TS 10303-1122 |
| Extended_measure_representation_arm |
ISO/TS 10303-1106 |
| Value_with_unit_extension_arm |
ISO/TS 10303-1753 |
NOTE 2
See Annex C,
Figures
C.1, C.2and C.3
for a graphical representation of this schema.
This subclause specifies the ARM types
for this application module. The ARM types and
definitions are specified below.
The adjoining_or_centred is an identification of the method by which the radius is located.
EXPRESS specification:
            *)

            TYPE
            adjoining_or_centred =

            ENUMERATION

            OF


            (adjoining,
    centred);

            END_TYPE;

            (*
Enumerated item definitions:
adjoining:
the radius is located by its end points;
centred:
the radius is located by its centre.
The angle_relator type is an identification of an angle. This angle is one of a set of angles created by:
EXPRESS specification:
            *)

            TYPE
            angle_relator =

            ENUMERATION

            OF


            (equal,
    large,
    small);

            END_TYPE;

            (*
Enumerated item definitions:
equal:
the numerical measure of the angles is equal at the point of intersection between two
Shape_elements;
large:
the numerical measure of the selected angle at the point of intersection between two
Shape_elements
is the larger absolute value;
small:
the numerical measure of the selected angle at the point of intersection between two
Shape_elements
is the smaller absolute value.
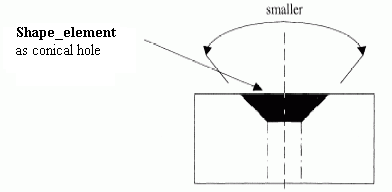
EXAMPLE
Figure 1
illustrates a type of single angular
Shape_element.
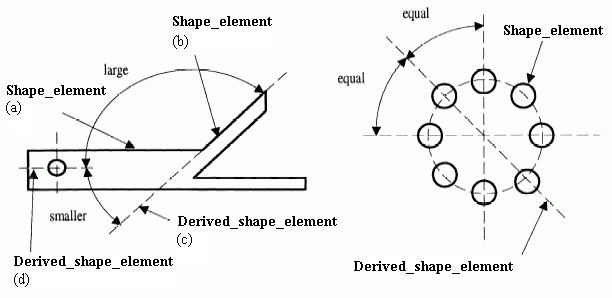
See
figure 2
for types of intersections of
Shape_elements.
Figure 1 — Single angular shape element
A diameter_qualifier_enumeration
specifies the type of the qualifier of a
Linear_distance.
EXPRESS specification:
            *)

            TYPE
            diameter_qualifier_enumeration =

            ENUMERATION

            OF


            (centre_outer,
    centre_inner,
    outer_centre,
    outer_outer,
    outer_inner,
    inner_centre,
    inner_outer,
    inner_inner);

            END_TYPE;

            (*
Enumerated item definitions:
centre_outer:
specifies that for the relating
Shape_element
the centre shall be used and for the related
Shape_element
the outer boundary shall be used.
centre_inner:
specifies that for the relating
Shape_element
the centre shall be used and for the related
Shape_element
the inner boundary shall be used.
outer_centre:
specifies that for the relating
Shape_element
the outer boundary shall be used and for the related
Shape_element
the centre shall be used.
outer_outer:
specifies that for the relating
Shape_element
the outer boundary shall be used and for the related
Shape_element
the outer boundary shall be used.
outer_inner:
specifies that for the relating
Shape_element
the outer boundary shall be used and for the related
Shape_element
the inner boundary shall be used.
inner_centre:
specifies that for the relating
Shape_element
the inner boundary shall be used and for the related
Shape_element
the centre shall be used.
inner_outer:
specifies that for the relating
Shape_element
the inner boundary shall be used and for the related
Shape_element
the outer boundary shall be used.
inner_inner:
specifies that for the relating
Shape_element
the inner boundary shall be used and for the related
Shape_element
the inner boundary shall be used.
The diameter_type type specifies distinct kinds of diameter for distinct kinds of geometry.
EXPRESS specification:
            *)

            TYPE
            diameter_type =

            ENUMERATION

            OF


            (circular_or_cylindrical_diameter,
    spherical_diameter,
    toroidal_minor_diameter,
    toroidal_major_diameter,
    toroidal_high_major_diameter,
    toroidal_low_major_diameter);

            END_TYPE;

            (*
Enumerated item definitions:
circular_or_cylindrical_diameter:
the diameter of a circle or cylinder;
spherical_diameter:
the diameter of a sphere;
toroidal_minor_diameter:
the minor diameter of a torus;
toroidal_major_diameter:
the major diameter of a torus;
toroidal_high_major_diameter:
the high major diameter of a torus, also known as the outside diameter;
toroidal_low_major_diameter:
the low major diameter of a torus, also known as the inside diameter.
The dimension_target type is an
extensible list of alternate data types.
Additional alternate data types are specified in select data
types that extend the
dimension_target type.
NOTE
This empty extensible select requires
extension in a further module to ensure that entities that refer to it have
at least one valid instantiation.
EXPRESS specification:
            *)

            TYPE
            dimension_target =

            EXTENSIBLE

            GENERIC_ENTITY


            SELECT;

            END_TYPE;

            (*
The dimension_value_select type allows for the designation of the data
types
Dimension_value_with_limitation, Numerical_item_with_unit, Tolerance_range, and Value_limit.
EXPRESS specification:
            *)

            TYPE
            dimension_value_select =


            SELECT

               (Dimension_value_with_limitation,
    Numerical_item_with_unit,
    Tolerance_range,
    Value_limit);

            END_TYPE;

            (*
The dt_activity_item type is an extension
of the
activity_item type.
It adds the data
types
Dimensional_size and Dimensional_location
to the list of alternate data types.
EXPRESS specification:
            *)

            TYPE
            dt_activity_item =


            SELECT
            BASED_ON
            activity_item
            WITH


               (Dimensional_size,
    Dimensional_location);

            END_TYPE;

            (*
The edge_of_undefined_shape_size_element type is an
extensible list of alternate data types.
Additional alternate data types are specified in select data
types that extend the
edge_of_undefined_shape_size_element type.
NOTE
This empty extensible select requires
extension in a further module to ensure that entities that refer to it have
at least one valid instantiation.
EXPRESS specification:
            *)

            TYPE
            edge_of_undefined_shape_size_element =

            EXTENSIBLE

            GENERIC_ENTITY


            SELECT;

            END_TYPE;

            (*
The geometric_dimension_modifier is an extensible list of modifier symbols, which can be associated to the datum letter.
EXPRESS specification:
            *)

            TYPE
            geometric_dimension_modifier =

            EXTENSIBLE

            ENUMERATION

            OF


            (two_point_size,
    local_size_defined_by_a_sphere,
    least_square_association_criteria,
    maximum_inscribed_association_criteria,
    minimum_circumscribed_association_criteria,
    circumference_diameter_calculated_size,
    area_diameter_calculated_size,
    volume_diameter_calculated_size,
    maximum_rank_order_size,
    minimum_rank_order_size,
    average_rank_order_size,
    median_rank_order_size,
    mid_range_rank_order_size,
    range_rank_order_size,
    any_part_of_the_feature,
    any_cross_section,
    specific_fixed_cross_section,
    common_tolerance,
    free_state_condition,
    statistical,
    continuous_feature,
    square,
    controlled_radius,
    united_feature_of_size);

            END_TYPE;

            (*
Enumerated item definitions:
two_point_size:
the modifier symbol is two-point size - LP;
local_size_defined_by_a_sphere:
the modifier symbol is local size defined by a sphere - LS;
least_square_association_criteria:
the modifier symbol is least-square association criteria - GG;
maximum_inscribed_association_criteria:
the modifier symbol is maximum inscribed association criteria - GX;
minimum_circumscribed_association_criteria:
the modifier symbol is minimum circumscribed association criteria - GN;
circumference_diameter_calculated_size:
the modifier symbol is circumference diameter (Calculated size) - CC;
area_diameter_calculated_size:
the modifier symbol is area diameter (Calculated size) - CA;
volume_diameter_calculated_size:
the modifier symbol is volume diameter (Calculated size) - CV;
maximum_rank_order_size:
the modifier symbol is maximum (rank order ) size - SX;
minimum_rank_order_size:
the modifier symbol is minimum (rank order ) size - SN;
average_rank_order_size:
the modifier symbol is average (rank order ) size - SA;
median_rank_order_size:
the modifier symbol is median (rank order) size - SM;
mid_range_rank_order_size:
the modifier symbol is mid-range (rank order) size - SD;
range_rank_order_size:
the modifier symbol is range (rank order) size - SR;
any_part_of_the_feature:
the modifier symbol is any part of the feature - APF;
any_cross_section:
the modifier symbol is any cross section - ACS;
specific_fixed_cross_section:
the modifier symbol is specific fixed cross section - SCS;
common_tolerance:
the modifier symbol is common tolerance - CT;
free_state_condition:
the modifier symbol is free-state condition - Ⓕ;
statistical:
the modifier symbol is statistical - <ST>;
NOTE 1
The symbol is used in ASME Y14.5-2009.
continuous_feature:
the modifier symbol is continuous Feature - <CF>;
NOTE 2
The symbol is used in ASME Y14.5-2009.
square:
the modifier symbol is square (square symbol);
NOTE 3
The symbol is used in ASME Y14.5-2009.
controlled_radius:
the modifier symbol is controlled radius - CR;
NOTE 4
The symbol is used in ASME Y14.5-2009.
united_feature_of_size:
the modifier symbol is united feature of size - UF.
The limitation_definition_select type allows for the designation of the data
types
Limits_and_fits and Plus_minus_bounds.
EXPRESS specification:
            *)

            TYPE
            limitation_definition_select =


            SELECT

               (Limits_and_fits,
    Plus_minus_bounds);

            END_TYPE;

            (*
The radial_type type specifies distinct kinds of radius for distinct kinds of geometry.
EXPRESS specification:
            *)

            TYPE
            radial_type =

            ENUMERATION

            OF


            (circular_or_cylindrical_radius,
    spherical_radius,
    toroidal_minor_radius,
    toroidal_major_radius,
    toroidal_high_major_radius,
    toroidal_low_major_radius);

            END_TYPE;

            (*
Enumerated item definitions:
circular_or_cylindrical_radius:
the radius of a circle or cylinder;
spherical_radius:
the radius of a sphere;
toroidal_minor_radius:
the minor radius of a torus;
toroidal_major_radius:
the major radius of a torus;
toroidal_high_major_radius:
the high major radius of a torus, also known as the outside radius;
toroidal_low_major_radius:
the low major radius of a torus, also known as the inside radius.
The tolerance_principle_type type specifies the types of tolerance principle.
EXPRESS specification:
            *)

            TYPE
            tolerance_principle_type =

            ENUMERATION

            OF


            (envelope_requirement,
    independency,
    default);

            END_TYPE;

            (*
Enumerated item definitions:
envelope_requirement:
the tolerance principle is envelope requirement;
independency:
the tolerance principle is independency requirement;
default:
the tolerance principle is an empty string.
The undefined_edge_shape_enumeration_direction type specifies which neighbouring surface of an
Edge_of_undefined_shape_size
is affected.
EXPRESS specification:
            *)

            TYPE
            undefined_edge_shape_enumeration_direction =

            ENUMERATION

            OF


            (true_neighbor,
    false_neighbor,
    both_neighbors);

            END_TYPE;

            (*
Enumerated item definitions:
true_neighbor:
the neighbouring surface that includes the
Oriented_edge
with the .TRUE. orientation is affected.
false_neighbor:
the neighbouring surface that includes the
Oriented_edge
with the .FALSE. orientation is affected.
both_neighbors:
both neighbouring surfaces are affected.
This subclause specifies the ARM entities for this
module. Each ARM application entity is an atomic element that
embodies a unique application concept and contains attributes
specifying the data elements of the entity. The ARM
entities and definitions are specified below.
An Angle_plus_minus_bounds is a type of
Plus_minus_bounds in which the domain is a plane angle.
EXPRESS specification:
            *)

            ENTITY Angle_plus_minus_bounds

              SUBTYPE OF (Plus_minus_bounds);


              SELF\Plus_minus_bounds.lower_bound : Angle_data_element;


              SELF\Plus_minus_bounds.upper_bound : Angle_data_element;

            END_ENTITY;
(*
Attribute definitions:
lower_bound:
an attribute inherited from the Plus_minus_bounds in which the lower_bound is an Angle_data_element.
upper_bound:
an attribute inherited from the Plus_minus_bounds in which the upper_bound is an Angle_data_element.
An Angular_location is a type of
Dimensional_location.
An Angular_location specifies that a spatial constraint exists between two
Shape_elements
that intersect or would intersect if projected.
An Angular_location is a measure of the angle defined by the two
Shape_elements
and their common intersection or projected intersection.
NOTE
The application and use of an Angular_location is illustrated in
Figure 2.
Figure 2
also illustrates types of intersection of two
Shape_elements
(a and b) and virtual intersection formed by
Derived_shape_elements
(c and d).
Figure 2 — Angular_location
EXPRESS specification:
            *)

            ENTITY Angular_location

              SUBTYPE OF (Dimensional_location);


              angle_selection : angle_relator;


              orientation :
            OPTIONAL
            Axis_placement;

            END_ENTITY;
(*
Attribute definitions:
angle_selection:
an indication of the specific angle type at the point of intersection.
orientation:
an axis placement establishing the direction of positive measure of the Angular_location.
The angle extends in the XY plane from the X axis towards Y, about the origin.
The value of this attribute need not be specified.
An Angular_size is a type of
Dimensional_size.
An Angular_size size is the measure of the angle formed by two boundaries of the
Shape_element
and their common or projected intersection.
An Angular_size defines an angular spatial characteristic of a
Shape_element.
An Angular_size is represented by a single magnitude and is independent of the location of the
Shape_element
on or within the product.
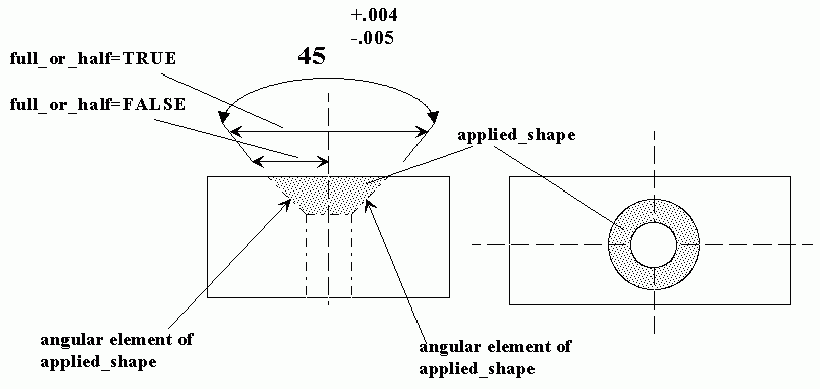
NOTE
Figure 3 illustrates the Angular_size.
Figure 3 — Angular_size
EXPRESS specification:
            *)

            ENTITY Angular_size

              SUBTYPE OF (Dimensional_size);


              full : BOOLEAN;


              angle_selection : angle_relator;

            END_ENTITY;
(*
Attribute definitions:
full:
specifies the Boolean value.
A value of true specifies the angle is established between the two sides of an angular element.
A value of false specifies the angle is established between a centre line datum and an angular element.
angle_selection:
an indication of the specific type of angle at the point of intersection.
A Curved_distance is a type of
Dimensional_location
that represents the arc length along a curve.
EXPRESS specification:
            *)

            ENTITY Curved_distance

              SUBTYPE OF (Dimensional_location);


              used_path : Measurement_path;

            END_ENTITY;
(*
Attribute definitions:
used_path:
the curve that represents the arc whose length is represented by the Curved_distance.
A Curved_size is a type of
Dimensional_size
that is the tolerance on a dimension for a curve measured along the entire path of a curve.
EXPRESS specification:
            *)

            ENTITY Curved_size

              SUBTYPE OF (Dimensional_size);

            END_ENTITY;
(*
A Diameter_size is a type of
Dimensional_size
that is a diameter of a circular, cylindrical, spherical, or toroidal feature.
EXPRESS specification:
            *)

            ENTITY Diameter_size

              SUBTYPE OF (Dimensional_size);


              geometry_type : diameter_type;

            END_ENTITY;
(*
Attribute definitions:
geometry_type:
the kind of diameter.
A Dimension_value_with_limitation is the value range of a toleranced geometric dimension.
A toleranced geometric dimension is given as a nominal value that is qualified to create a range of allowable values.
EXPRESS specification:
            *)

            ENTITY Dimension_value_with_limitation;


              defined_by : limitation_definition_select;


              limited_value : Numerical_item_with_unit;

            END_ENTITY;
(*
Attribute definitions:
defined_by:
the specification of the tolerance range. The range is defined_by either a
Plus_minus_bounds,
or by a reference to a system of limits and fits for the nominal value.
limited_value:
the value that is limited.
A Dimensional_location is a type of
Geometric_dimension
that represents the specification of the distance or angle that one feature is displaced from another feature.
A Dimensional_location specifies that a spatial constraint exists between two
Shape_elements
that are represented as a non-directed measure applied along a measurement path.
NOTE 1
Representation of a
Shape_element
participating in the Dimensional_location relationship implies a measuring direction for the Dimensional_location through the related
and relating
Shape_element.
The meaning of the direction is specified in an application protocol.
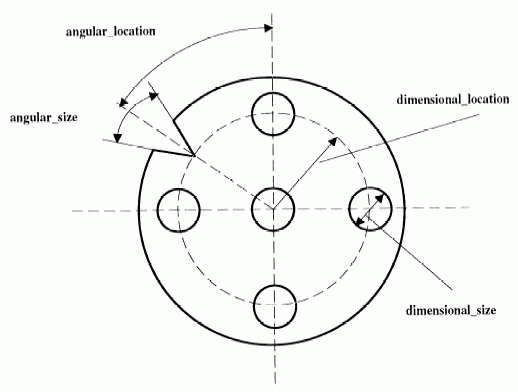
NOTE 2
The application and use of Dimensional_location and
Dimensional_size
are shown in
figure 4.
EXAMPLE 1
The short edge of a plate is located 90 degrees relative to the long edge.
EXAMPLE 2
The centre of the hole is 10 centimetres from the short edge.
A Dimensional_location is either an
Angular_location
or a
Curved_distance,
or a
Linear_distance.
Figure 4 — Dimensional location and dimensional size
EXPRESS specification:
            *)

            ENTITY Dimensional_location

              ABSTRACT SUPERTYPE

            OF (ONEOF (Angular_location,
                                Curved_distance,
                                Linear_distance))

              SUBTYPE OF (Geometric_dimension);


              description :
            OPTIONAL
            STRING;


              directed :
            OPTIONAL
            BOOLEAN;


              origin : dimension_target;


              target : dimension_target;

            END_ENTITY;
(*
Attribute definitions:
description:
the text that provides further information about the Dimensional_location. The value of this attribute need not be specified.
directed:
a Boolean value designating the importance of direction for measuring a Dimensional_location. If the value is 'true' the Dimensional_location is measured from origin to target. A value of 'false' indicates that the direction for measuring the Dimensional_location
is inconsequential. The value of this attribute need not be specified.
origin:
the element that is the origin for the Dimensional_location.
target:
the element that is the target for the Dimensional_location.
A Dimensional_size is a type of
Geometric_dimension.
A Dimensional_size is a spatial characteristic of a
Shape_element
that is represented by a measure.
This magnitude is independent of the location of the
Shape_element
on or within the product.
EXAMPLE 1
The diameter of a hole is 2 centimetres.
NOTE 1
Dimensional_size as defined in this part of ISO 10303 describe an intrinsic length or angle characteristic of part shape.
This includes characteristics of what are traditionally called "features-of-size",
but they are not limited to that usage alone.
For example, the
Radial_size
and
Curved_size
application objects describe characteristics which may not be applied to "features-of-size".
A Dimensional_size is either an
Angular_size
or a
Curved_size,
or a
Diameter_size,
or a
Machining_feature_size,
or a
Radial_size,
or a
Thickness_size.
EXPRESS specification:
            *)

            ENTITY Dimensional_size

              ABSTRACT SUPERTYPE

            OF (ONEOF (Angular_size,
                                Curved_size,
                                Diameter_size,
                                Edge_of_undefined_shape_size,
                                Machining_feature_size,
                                Radial_size,
                                Thickness_size))

              SUBTYPE OF (Geometric_dimension);


              is_applied_to : dimension_target;

            END_ENTITY;
(*
Attribute definitions:
is_applied_to:
the Shape_element
to which the Dimensional_size is applied.
An Edge_of_undefined_shape_size is a type of
Geometric_dimension
that represents an "edge of undefined shape" size as defined in ISO 13715.
EXPRESS specification:
            *)

            ENTITY Edge_of_undefined_shape_size

              SUBTYPE OF (Dimensional_size);


              orientation : undefined_edge_shape_enumeration_direction;


              SELF\Dimensional_size.is_applied_to : edge_of_undefined_shape_size_element;


              SELF\Geometric_dimension.dimension_value : Tolerance_range;
UNIQUE

              UR1: is_applied_to, orientation;

            END_ENTITY;
(*
Attribute definitions:
orientation:
specifies which neighbouring surface of the edge is affected.
is_applied_to:
specifies the affected geometric edge object.
dimension_value:
specifies the value as a
Tolerance_range.
EXAMPLE
A part has several edges with undefined shapes as indicated below:
- an annotation of "-0,3" is represented with a
lower_range
value of -0.3 and an
upper_range
value of 0;
- an annotation of "+0,02" is represented with a
lower_range
value of 0 and an
upper_range
value of +0,02;
- an annotation of "+1/+0,5" is represented with a
lower_range
value of +0,5 and an
upper_range
value of +1;
- an annotation of "+1/-0,5" is represented with a
lower_range
value of -0.5 and an
upper_range
value of +1;
- an annotation of "-1/-2,5" is represented with a
lower_range
value of -2,5 and an
upper_range
value of -1;
- an annotation of "+/-0,05" is represented with a
lower_range
value of -0.05 and an
upper_range
value of +0,05.
Formal propositions:
UR1:
A geometric edge object shall not have more than one Edge_of_undefined_shape_size for an orientation.
A Geometric_dimension is the specification of size of an element of a shape,
or a displacement of one shape element relative to another shape element.
A Geometric_dimension is either a
Dimensional_location
or a
Dimensional_size.
EXPRESS specification:
            *)

            ENTITY Geometric_dimension

              ABSTRACT SUPERTYPE

            OF (ONEOF (Dimensional_location,
                                Dimensional_size));


              id : STRING;


              dimension_value : dimension_value_select;


              notes : SET[0:?] OF STRING;


              theoretical_exact : BOOLEAN;


              auxiliary : BOOLEAN;


              tolerance_principle : tolerance_principle_type;


              modifiers : LIST[0:?] OF geometric_dimension_modifier;


              unit_length :
            OPTIONAL
            Length_data_element;

            END_ENTITY;
(*
Attribute definitions:
id:
the identifier of the Geometric_dimension.
dimension_value:
the value of size of the element or of the distance between the two elements.
notes:
the set of instances of text that provide additional information about the Geometric_dimension.
theoretical_exact:
a Boolean value that specifies whether the dimension value is theoretically exact or not.
A value of 'true' indicates that this size dimension is theoretically exact.
auxiliary:
a Boolean value that specifies whether the dimension value is for information purposes only or not.
A value of 'true' indicates that this dimension is for information purposes only.
tolerance_principle:
specifies the role of the
tolerance_principle_type
for the Geometric_dimension.
modifiers:
specifies the role of the
geometric_dimension_modifier
for the Geometric_dimension.
There shall exist zero or more
geometric_dimension_modifiers
for the Geometric_dimension.
unit_length:
specifies the role of the
Length_data_element
for the Geometric_dimension.
The value of this attribute need not be specified.
A Length_plus_minus_bounds is a type of
Plus_minus_bounds in which the domain is a distance.
EXPRESS specification:
            *)

            ENTITY Length_plus_minus_bounds

              SUBTYPE OF (Plus_minus_bounds);


              SELF\Plus_minus_bounds.lower_bound : Length_data_element;


              SELF\Plus_minus_bounds.upper_bound : Length_data_element;

            END_ENTITY;
(*
Attribute definitions:
lower_bound:
an attribute inherited from the Plus_minus_bounds in which the lower_bound is a Length_data_element.
upper_bound:
an attribute inherited from the Plus_minus_bounds in which the upper_bound is a Length_data_element.
A Limits_and_fits is a tolerance specified by reference to the limits-and-fits
system standardized by ISO 286. The application of Limits_and_fits shall conform to
the requirements of ISO 286. Limits and fits is a system for assigning
tolerances associated with the assembly of mating product features.
EXAMPLE 1
A hole and a shaft that are intended to mate in an assembly.
In limits-and-fits system, a tolerance is assigned to a feature of size by classification rather than by giving an explicit
value.
A tolerance classification is composed of a fundamental deviation or "position letter" and a tolerance grade.
These are used to calculate the size of the tolerance zone and its location relative to the basic or nominal size of
the feature according to the tables and formulas found in ISO 286.
EXPRESS specification:
            *)

            ENTITY Limits_and_fits;


              deviation : STRING;


              fitting_type :
            OPTIONAL
            STRING;


              grade : STRING;

            END_ENTITY;
(*
Attribute definitions:
deviation:
a representation of the fundamental deviation or "position letter" of the ISO 286 limits-and-fits tolerance classification.
Only symbols defined in ISO 286 shall be provided.
NOTE 1
The symbols 'A' to 'ZC' for holes or 'a' to 'zc' for shafts may be used to classify deviation.
fitting_type:
the kind of fitting to which the tolerance applies.
Normally the tolerance applies to an external or internal feature of the workpiece.
Where applicable the following values shall be used:
- "hole": the tolerance applies to an internal feature of the workpiece;
- "shaft": the tolerance applies to an external feature of the workpiece.
NOTE 2
Whether the tolerance applies to an interior or exterior feature can be determined from the position letter of the fundamental
deviation, therefore fitting_type need not be specified.
The value of this attribute need not be specified.
grade:
a representation of the quality or the accuracy grade of a tolerance. Only symbols defined in ISO 286 shall be provided.
NOTE 3
The grade is one of the 18 international standard tolerance grades defined in ISO 286.
EXAMPLE 2
'IT07' is a standard tolerance grade.
A Linear_distance is a type of
Dimensional_location
that specifies the distance along a straight line between two elements of a shape.
EXPRESS specification:
            *)

            ENTITY Linear_distance

              SUBTYPE OF (Dimensional_location);


              orientation :
            OPTIONAL
            Axis_placement;


              diameter_qualifier :
            OPTIONAL
            diameter_qualifier_enumeration;

            END_ENTITY;
(*
Attribute definitions:
orientation:
a point and a direction along which the Linear_distance is measured.
The direction is the x-axis of the axis placement.
The value of this attribute need not be specified.
diameter_qualifier:
if the distance is measured between objects that have a diameter such as a circle, cylinder or sphere
this value specifies on whether to use the centre or inner or outer border of one object
in relation to the other object. The enumeration value specifies the value for the
relating
followed by the value for the
related
object. If one of the objects has no diameter, then the centre value must be used.
The value of this attribute shall not be specified if both objects
are not of type circle, cylinder or sphere or for both objects if the centre position is taken.
A Machining_feature_size is a type of
Dimensional_size.
EXPRESS specification:
            *)

            ENTITY Machining_feature_size

              SUBTYPE OF (Dimensional_size);


              considered_attribute : STRING;

            END_ENTITY;
(*
Attribute definitions:
considered_attribute:
an identification of a considered attribute.
A Measurement_path is a path, direction, or domain of applicability for a dimension or tolerance.
The path is represented by a
Curve.
A Measurement_path is a general term whose meaning depends on the context entity which is using it.
EXAMPLE 1
A surface may only need to be smooth in one direction.
EXAMPLE 2
A dimension of a fillet may be specified by its arc length, which is a measurement path.
EXPRESS specification:
            *)

            ENTITY Measurement_path;


              defined_by : Curve;


              defined_in : Geometric_coordinate_space;

            END_ENTITY;
(*
Attribute definitions:
defined_by:
specifies the role of the
Curve
for the Measurement_path.
The defined_by is the
Curve
along which the measurement takes place, or a requirement applies.
defined_in:
specifies the role of the
Geometric_coordinate_space
for the Measurement_path.
The defined_in is the
Geometric_coordinate_space
that identifies the geometric context in which the measurement path is evaluated.
A Plus_minus_bounds is the specification of a tolerance by offsets which are each added to the
limited_value
which is the nominal value, to create the two limits of the allowable range.
EXPRESS specification:
            *)

            ENTITY Plus_minus_bounds

              SUPERTYPE OF (ONEOF (Angle_plus_minus_bounds,
                       Length_plus_minus_bounds));


              lower_bound : Value_with_unit;


              upper_bound : Value_with_unit;

            END_ENTITY;
(*
Attribute definitions:
lower_bound:
the lower offset.
NOTE 1
the lower_bound may be positive or negative.
upper_bound:
the upper offset.
NOTE 2
the upper_bound may be positive or negative.
A Radial_size is a type of
Dimensional_size
that is a radius of a circular, cylindrical, spherical, or toroidal feature.
EXPRESS specification:
            *)

            ENTITY Radial_size

              SUBTYPE OF (Dimensional_size);


              radius_type :
            OPTIONAL
            adjoining_or_centred;


              geometry_type : radial_type;

            END_ENTITY;
(*
Attribute definitions:
radius_type:
the specification of the method by which the radius is located. The value of this attribute need not be specified.
geometry_type:
the kind of radius.
A Thickness_size is a type of
Dimensional_size
that represents a thickness. Use of Thickness_size is user defined.
EXAMPLE 1
The remaining thickness below a blind hole might be specified as a Thickness_size.
EXAMPLE 2
The thickness of a coating layer is a Thickness_size.
EXPRESS specification:
            *)

            ENTITY Thickness_size

              SUBTYPE OF (Dimensional_size);


              used_path :
            OPTIONAL
            Measurement_path;

            END_ENTITY;
(*
Attribute definitions:
used_path:
the path along which the Thickness_size is applied or measured.
The value of this attribute need not be specified.
A Tolerance_range is a pair of numbers representing the range in which a dimension_value shall lie.
EXPRESS specification:
            *)

            ENTITY Tolerance_range;


              lower_range : Numerical_item_with_unit;


              upper_range : Numerical_item_with_unit;

            END_ENTITY;
(*
Attribute definitions:
lower_range:
the lower limit.
upper_range:
the upper limit.
         *)

         END_SCHEMA;  -- Dimension_tolerance_arm
(*
© ISO 2019 — All rights reserved


