|
|
Application module:
Default tolerance |
ISO/TS 10303-1052:2014-02(E)
© ISO
|
Annex F
(informative)
Application module implementation and usage guide
This Application Module enable default values to be assigned to geometric dimensions by a general tolerance table, There can
be zero or more tolerance tables; each applies to a particular tolerance characteristic
EXAMPLE
angle dimensions, hole diameters are examples of tolerance characteristics to whcih a default tolerance may apply.
A tolerance table is a matrix of cells. The rows of the table correspond to tolerance classes, that is, general categories
of tolerancing such as course or fine, that reflect a functional need. Refer to Annex G Technical Discussion for more information.
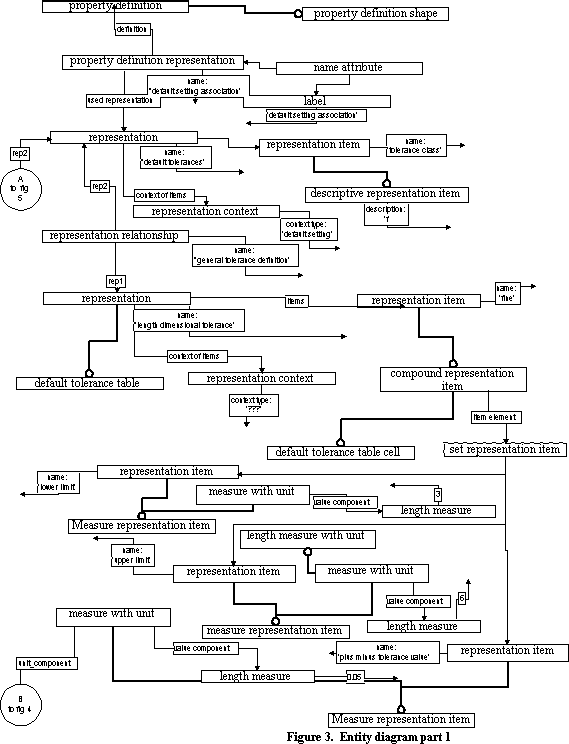
In this Application Module, a property_definition_representation (MIM element) associates a representation of the tolerance
class to the property_definition_shape. This is analogous to a drawing callout of a tolerance class. More than one tolerance
class may be applicable to a shape. One representatation and one property_definition_representation are needed for each
applicable tolerance class. The same or different tolerance classes may apply to different shapes.
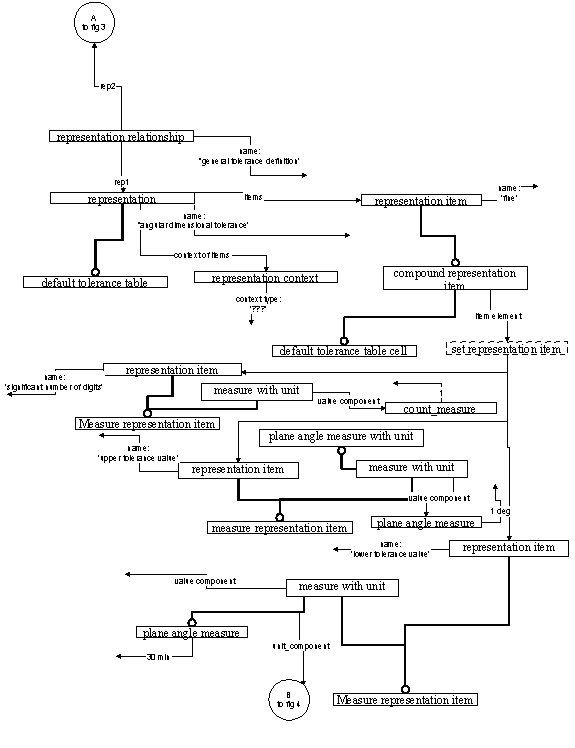
A default_tolerance_table contains a set of default_tolerance_table_cells. The cells are named for a tolerance class (the row) . The default_tolerance_table_cell is a compound_representation_item; its item_element s specify a size range (the column) and a tolerance value. Each of
these requires either one or two measure_representation_items. A size range may be a pair of upper and lower limits, or a
single number of significant digits. Significant digits refers to how the dimension is presented on the drawing. A tolerance
value may be a single plus and minus value, or two separate values, one for plus tolerance, one for minus. A default_tolerance_table is analogous to a table in ISO 2768.
A default_tolerance_table is associated to a called out tolerance class by a representation_relationship. More than one table may be so associated.
Each table would normally contain a row for the tolerance class called out, and perhaps other rows. The tables provide
the context for interpreting the tolerance class. Another shape may specify a different class, but from the same table(s).
There is no STEP element to directly tie the appropriate rows to the callout. The application must find in each table the
cells whose tolerance class name matches that of each callout.
Table 1 has been adapted from Table 1 in ISO 2768-1 and is an example of a general tolerance table for dimensional tolerancing.
Table
F.1 — Example default tolerances: Permissible deviation for basic size ranges. Adapted from Table 1 from ISO 2768-1.
|
Tolerance Class
|
Description
|
0,5 up to 3
|
Over 3 up to 6
|
Over 6 up to 30
|
| f |
fine |
±0.05 |
±0.05 |
±0.1 |
| m |
medium
|
±0.1 |
±0.1 |
±0.2 |
| c |
coarse |
±0.2 |
±0.3 |
±0.5 |
| v |
Very coarse |
- |
±0.5 |
±1 |
The following ISO 10303-21 file represents the content of Table F.1.
In particular, instances #31, #32, #33 and #100 represent the content of the second tolerance cell of the first row.
ISO-10303-21;
HEADER;
FILE_DESCRIPTION(('default tolerances example - one cell table',''),'2;1');
FILE_NAME('def_tol_one_cell.stp',
'1999-04-28 T12:00:00',
('Tom Hendrix'),
('','',''),
'',
'',
'');
FILE_SCHEMA(('DEFAULT_TOLERANCE_MIM'));
ENDSEC;
DATA;

/****************************************************************
 * units							*
 *                    						*
 ****************************************************************/

#1=DIMENSIONAL_EXPONENTS(1.0,0.0,0.0,0.0,0.0,0.0,0.0); /* L**1 */
#2=DIMENSIONAL_EXPONENTS(0.0,0.0,0.0,0.0,0.0,0.0,0.0); /* angle */
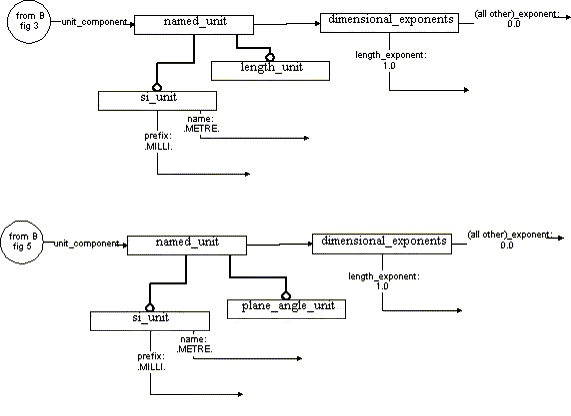
#10=(LENGTH_UNIT()NAMED_UNIT(*)SI_UNIT(.MILLI.,.METRE.));/* mm */
#19=(NAMED_UNIT(*)PLANE_ANGLE_UNIT()SI_UNIT($,.RADIAN.));
#20=PLANE_ANGLE_MEASURE_WITH_UNIT(PLANE_ANGLE_MEASURE(0.017453292519943),#19);
#24=(CONVERSION_BASED_UNIT('DEGREE',#20)NAMED_UNIT(#2)PLANE_ANGLE_UNIT());

/****************************************************************
 * Note: Values for representation context			*
 *        not in AP 214 mapping table  			        *
 ****************************************************************/

#70=REPRESENTATION_CONTEXT('general tolerances','gen_tols');
#71=REPRESENTATION_CONTEXT('default setting','defaults');

/****************************************************************
 * START a default table for linear dimensional tolerance,	*
 *    withtwo rows and two columns. 				*
 *   Table is a portion of ISO 2768 Table 1   			*
 ****************************************************************/

 /***************************************************************
 * first row        						*
 *								*
 ****************************************************************/

/****************************************************************
 * first cell        						*
 *								*
 ****************************************************************/


#31=(LENGTH_MEASURE_WITH_UNIT() MEASURE_REPRESENTATION_ITEM()
	MEASURE_WITH_UNIT(LENGTH_MEASURE(3.),#10)
	REPRESENTATION_ITEM('lower limit'));
#32=(LENGTH_MEASURE_WITH_UNIT() MEASURE_REPRESENTATION_ITEM()
	MEASURE_WITH_UNIT(LENGTH_MEASURE(6.),#10)
	REPRESENTATION_ITEM('upper limit'));
#33=(LENGTH_MEASURE_WITH_UNIT() MEASURE_REPRESENTATION_ITEM()
	MEASURE_WITH_UNIT(LENGTH_MEASURE(0.05),#10)
	REPRESENTATION_ITEM('plus minus tolerance value') );

#100=DEFAULT_TOLERANCE_TABLE_CELL('f', SET_REPRESENTATION_ITEM((#31,#32,#33)));

/****************************************************************
 * second  cell        						*
 *								*
 ****************************************************************/

#34=(LENGTH_MEASURE_WITH_UNIT() MEASURE_REPRESENTATION_ITEM()
	MEASURE_WITH_UNIT(LENGTH_MEASURE(6.),#10)
	REPRESENTATION_ITEM('lower limit'));
#35=(LENGTH_MEASURE_WITH_UNIT() MEASURE_REPRESENTATION_ITEM()
	MEASURE_WITH_UNIT(LENGTH_MEASURE(30.),#10)
	REPRESENTATION_ITEM('upper limit') );
#36=(LENGTH_MEASURE_WITH_UNIT() MEASURE_REPRESENTATION_ITEM()
	MEASURE_WITH_UNIT(LENGTH_MEASURE(0.1),#10)
	REPRESENTATION_ITEM('plus minus tolerance value') );

#101=DEFAULT_TOLERANCE_TABLE_CELL('f', SET_REPRESENTATION_ITEM((#34,#35,#36)));

 /***************************************************************
 * second row        						*
 *								*
 ****************************************************************/

/****************************************************************
 * first cell        						*
 *								*
 ****************************************************************/

#37=(LENGTH_MEASURE_WITH_UNIT() MEASURE_REPRESENTATION_ITEM()
	MEASURE_WITH_UNIT(LENGTH_MEASURE(0.1),#10)
	REPRESENTATION_ITEM('plus minus tolerance value') );

#102=DEFAULT_TOLERANCE_TABLE_CELL('m', SET_REPRESENTATION_ITEM((#31,#32,#37)));

/****************************************************************
 * second  cell        						*
 *								*
 ****************************************************************/

#38=(LENGTH_MEASURE_WITH_UNIT() MEASURE_REPRESENTATION_ITEM()
	MEASURE_WITH_UNIT(LENGTH_MEASURE(0.2),#10)
	REPRESENTATION_ITEM('plus minus tolerance value') );

#103=DEFAULT_TOLERANCE_TABLE_CELL('m', SET_REPRESENTATION_ITEM((#34,#35,#38)));

#150= DEFAULT_TOLERANCE_TABLE(
	'linear dimensions except for broken edges',
	(#100,#101,#102,#103),#70);

/****************************************************************
 * End of default table for linear dimensional tolerance 	*
 ****************************************************************/

/****************************************************************
 * START a default table for angular dimensional tolerance,	*
 *   withtwo rows and two columns. This example was invented	*
 *   in order to illustrate capabilities of module   		*
 ****************************************************************/

 /***************************************************************
 * first row        						*
 *								*
 ****************************************************************/

/****************************************************************
 * first cell        						*
 *								*
 ****************************************************************/


#41=( MEASURE_REPRESENTATION_ITEM() MEASURE_WITH_UNIT(PLANE_ANGLE_MEASURE(1.0),#24)PLANE_ANGLE_MEASURE_WITH_UNIT() REPRESENTATION_ITEM('upper tolerance value'));

#42=( MEASURE_REPRESENTATION_ITEM() MEASURE_WITH_UNIT(PLANE_ANGLE_MEASURE(0.5),#24)PLANE_ANGLE_MEASURE_WITH_UNIT() REPRESENTATION_ITEM('lower tolerance value'));

#43= MEASURE_REPRESENTATION_ITEM('significant number of digits', COUNT_MEASURE(1.0),#24);

#104=DEFAULT_TOLERANCE_TABLE_CELL('f', SET_REPRESENTATION_ITEM((#41,#42,#43)));

/****************************************************************
 * second  cell        						*
 *								*
 ****************************************************************/

#44=( MEASURE_REPRESENTATION_ITEM()
	MEASURE_WITH_UNIT(PLANE_ANGLE_MEASURE(2.0),#24)
	PLANE_ANGLE_MEASURE_WITH_UNIT()
	REPRESENTATION_ITEM('upper tolerance value'));

#45=( MEASURE_REPRESENTATION_ITEM()
	MEASURE_WITH_UNIT(PLANE_ANGLE_MEASURE(1.0),#24)
	PLANE_ANGLE_MEASURE_WITH_UNIT()
	REPRESENTATION_ITEM('lower tolerance value'));

#46=MEASURE_REPRESENTATION_ITEM('significant number of digits',COUNT_MEASURE(2.0),#24);

#105=DEFAULT_TOLERANCE_TABLE_CELL('f', SET_REPRESENTATION_ITEM((#44,#45,#46)));


 /***************************************************************
 * second row        						*
 *								*
 ****************************************************************/

/****************************************************************
 * first cell        						*
 *								*
 ****************************************************************/

#47=( MEASURE_REPRESENTATION_ITEM() MEASURE_WITH_UNIT(PLANE_ANGLE_MEASURE(2.0),#24)PLANE_ANGLE_MEASURE_WITH_UNIT() REPRESENTATION_ITEM('upper tolerance value'));

#48=( MEASURE_REPRESENTATION_ITEM() MEASURE_WITH_UNIT(PLANE_ANGLE_MEASURE(1.0),#24)PLANE_ANGLE_MEASURE_WITH_UNIT() REPRESENTATION_ITEM('lower tolerance value'));

#49=MEASURE_REPRESENTATION_ITEM('significant number of digits',COUNT_MEASURE(1.0),#24);

#106=DEFAULT_TOLERANCE_TABLE_CELL('m', SET_REPRESENTATION_ITEM((#47,#48,#49)));

/****************************************************************
 * second  cell        						*
 *								*
 ****************************************************************/

#50=( MEASURE_REPRESENTATION_ITEM()
	MEASURE_WITH_UNIT(PLANE_ANGLE_MEASURE(3.0),#24)
	PLANE_ANGLE_MEASURE_WITH_UNIT()
	REPRESENTATION_ITEM('upper tolerance value'));

#51=( MEASURE_REPRESENTATION_ITEM()
	MEASURE_WITH_UNIT(PLANE_ANGLE_MEASURE(2.0),#24)
	PLANE_ANGLE_MEASURE_WITH_UNIT()
	REPRESENTATION_ITEM('lower tolerance value'));

#52= MEASURE_REPRESENTATION_ITEM('significant number of digits',COUNT_MEASURE(2.0),#24);

#107=DEFAULT_TOLERANCE_TABLE_CELL('m', SET_REPRESENTATION_ITEM((#50,#51,#52)));

#151= DEFAULT_TOLERANCE_TABLE('angular dimensional tolerance',
         (#104,#105,#106,#107),#70);


/****************************************************************
 * End of default table for angular dimensional tolerance 	*
 ****************************************************************/

/****************************************************************
 * "fine" tolerances apply to dimensions of this part.		*
 * Analogous to drawing callout ISO 2768-f 			*
 ****************************************************************/

#200= DESCRIPTIVE_REPRESENTATION_ITEM('tolerance class','f');
#201= REPRESENTATION('default tolerances', (#200),#71);

/****************************************************************
 *  relationship between of default settings and		*
 *  default table for linear dimensional tolerances		*
 ****************************************************************/

#400= REPRESENTATION_RELATIONSHIP('general tolerance definition',$,#150,#201);

/****************************************************************
 *   relationship between of default settings and		*
 *   default table for angular dimensional  tolerances		*
 ****************************************************************/

#401= REPRESENTATION_RELATIONSHIP('general tolerance definition',$,#151,#201);

#300= CHARACTERIZED_OBJECT('item shape',$);
#301= PROPERTY_DEFINITION('name',$,#300);
#302= PROPERTY_DEFINITION_REPRESENTATION(#301,#201);
#501= NAME_ATTRIBUTE('default_setting_association',#302);

ENDSEC;
END-ISO-10303-21;

Figure F.1 — Entity instances example diagram 1 of 3
Figure F.2 — Entity instances example diagram 2 of 3
Figure F.3 — Entity instances example diagram 3 of 3
© ISO 2014 — All rights reserved


